Comments Off on XO’s Friday Foodie: Sarah’s Zippy Corn Chowder, now Gluten Free!

XO’s Friday Foodie: Sarah’s Zippy Corn Chowder, now Gluten Free!

Category : Healthy Eating

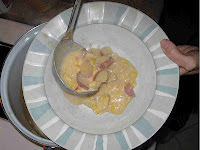
Sarah R is this week’s Friday Foodie who recommended we try this delicious, simple corn chowder. Like any soup, we tweaked it to suit the contents of our kitchen and the sensitive taste buds of our kids. I added the garlic, omitted a teaspoon of salt and skipped the optional ingredients and made it gluten free (GF) on Anne M’s suggestion to use 1/2 as much corn starch as the flour originally called for. It was the perfect warm and savory dinner for a cool spring evening.

The recipe makes 8 cups. A 1 cup serving has 200 calories, 3g fiber, 7 grams protein, 34g carbohydrates and just 4 grams of fat. Using unsalted butter, I’ve reduced the sodium to just 300mg/serving! Adding a diced, precooked chicken breast or other protein could easily make this a one-pot meal.

Ingredients
1 medium onion, chopped
1/2 to 1 medium green or red bell pepper, chopped (Sara advises the Red Bell Pepper!)
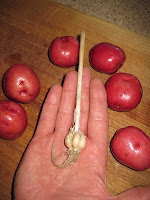
1 clove garlic, minced (I used 5 of Eben’s tiny cloves)
2 tablespoons butter

2 cups or 1 can (14-1/2 ounces) vegetable or chicken broth
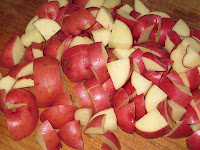
2 large red potatoes, cubed

3 cups frozen corn (an entire 1lb bag)
3 cups skim or 1% milk, divided

2 tablespoons cornstarch
2 teaspoons Dijon mustard (any mustard will work)
1/2 teaspoon paprika

optional ingredients for those who like spice (and don’t have kids):
1/4 to 1/2 teaspoon crushed red pepper flakes (Sarah recommends!)
1 jalapeno pepper, chopped
4 green onions, chopped (AKA we didn’t have these in the kitchen!)

In a large heavy saucepan saute the onion, bell pepper and garlic in the butter until tender. Add the broth and potatoes, bring to a boil, reduce heat and simmer until the potatoes are cooked through, about 10 – 15 minutes.

Next, add 2 1/2 cups milk, the corn, mustard, paprika and your choice of the optional ingredients and bring to a boil. Mix the corn starch into the remaining 1/2 cup of milk and stir into the pot. Simmer, stirring often, for 2 minutes until thickened. Each person could salt to taste, but we found it plenty salty. Being the spice guy, I added ground chipotle for a hot-smokey flavor.

I also wanted to answer the unasked question about what that mustard is doing in there. Thanks to Ken J, I can tell you that mustard emulsifies the butter (or oil) in a recipe so it doesn’t separate and float up to the top. That explains why you see it in some salad dressing recipes.

Enjoy!

Comments Off on Friday Foodie: Simple Spaghetti Squash

Friday Foodie: Simple Spaghetti Squash

Category : Healthy Eating

If you’ve never tried it, you must!!! This week’s food couldn’t be simpler to make or more beneficial to add to your diet. Spaghetti squash has just 46 calories per cup and makes a great substitute for regular spaghetti (220 calories per cup). A great way to add vegetables to your plate, spaghetti squash can be served with many of the toppings that you might put on regular noodles although we most often just use salt and pepper and dab of butter.

The real benefit is that neither Jack nor Jasmine complain (as much) as when we make regular squash!

Although you can bake or steam it, we almost always use the microwave oven. Simply cut the spaghetti squash in half lengthwise, scoop out the seeds and place in a microwave dish. I like to add a 1/4 cup water to each half and to the bottom of the dish to help steam the squash. Cover with a piece of waxpaper or parchment paper and microwave on high for 8-15 minutes until soft enough to pull apart with a fork. That’s it!!!

We serve it plain as our vegetable allowing each person to season it to their liking.

Do you have a favorite way of making or serving Spaghetti Squash? Please leave a comment or email us your suggestion!


Comments Off on >Friday Foodie: Shrimp Boil – Easy Clean-up

>Friday Foodie: Shrimp Boil – Easy Clean-up

Category : Healthy Eating

>This week’s Foodie is Joell, Karin’s sister who lives in Owasso, Oklahoma.  The whole Jennings-Kasbohm clan visited Joell for Easter and she shared her Shrimp Boil with us for Easter Dinner.  Her recipe involves a bit of prep but makes up for it with nearly zero cleanup, especially since you eat with your hands!

To feed 7-9 hungry people, here are the ingredients:

1 bag of Zatarain’s Crab Boil Seasoning
4-6 large cloves of garlic
3lbs Shrimp
2lbs small gold or red potatoes
2lbs small onions (quarter sized)
3 zucchini
3 ears of corn

Joell starts by filling a very large pot (4-5 gallon) pot with water and adds a packet of Zatrain’s Crab Boil seasonings and several whole cloves of garlic.  While this is heating to a boil, prep your ingredients:  Cut the Zucchini and Corn into 1 1/2 to 2″ chunks and peel the small onions.  Wash the potatoes (quarter larger ones) and put the shrimp into a pot of water to thaw.


When the water reaches a boil, add the vegetables and cook for 3 minutes.  Then add the shrimp and cook for one minute and remove from heat.  Allow to rest for 15 minutes.

Drain and pour the hot Shrimp Boil onto a table covered with either butcher block paper, a plastic tablecloth (wipe clean first!), or as we did this time, pieces of aluminum foil.

Serve with melted butter, rolls and lots and lots of napkins.  Commence eating with your hands!

Clean-up is simple:  Roll up the paper or foil and discard.

We hope you enjoyed this week’s Friday Foodie, Oklahoma style!

Update: 6/29/2012:  I used the side burner on our grill to do a family sized version.  Our side burner is pathetically underpowered, so I created a wind screen to keep the heat in.  It worked perfect (and kept the heat outside where it belongs!).  Photo below:

Grill Cooking on Side Burner

Grill Side-Burner Windscreen


Comments Off on >Friday Foodie: Iridescent Green Stuff

>Friday Foodie: Iridescent Green Stuff

Category : Healthy Eating

>One of my clients brought a kale smoothie (with Mango, blueberries and other goodies) for me to try and it was awesomely green and delicious. To quote Jenny T: “Who Knew?”

Anyway, the color reminded me of this recipe that Karin and I really enjoy. If you dare, here’s the recipe for Punjabi Mustard Greens based loosely on the recipe from the amazing cookbook “Madhur Jaffrey’s World of the East Vegetarian Cooking.” We affectionately call it ‘The iridescent green stuff.”

Note: Karin suggests bringing this as your dish to pass this easter! LOL!

1lb Spinach
1lb Mustard Greens
1″ piece of fresh ginger, about the diameter of a US quarter.
5-6 Tablespoons butter
Corn Meal: 1/2 cup
1 teaspoon salt (then salt to taste)

Directions:
  1. Coarsely chop and steam the mustard greens and spinach until wilted.
  2. Peel and slice the ginger across the grain. 
  3. Put the ginger and steamed greens into the blender with all the other ingredients (except butter and corn flour) and blend until pureed (adding steaming water as needed to allow blending).
  4. Melt the butter over low heat in a large saucepan and add ½ cup of cornmeal for texture.
  5. Stir over low heat a couple minutes to make it puff up a little.
  6. Add the puree to the cornmeal and butter.
  7. Stir constantly to thicken, salt to taste and serve with warm whole grain tortillas. Eat until silly.
Miscellaneous notes: 
The larger amount of ginger that I use (as noted here)adds some significant heat, so I don’t add the hot chili recommended in the original.  If you don’t want it as hot, don’t add as much ginger.   You can add a hot green chili (veins/seeds removed) if you like it really hot. The original also calls for less spinach and cornmeal and more butter, so this recipe is to my taste and texture preference.   
 

Enjoy, Ryan & Karin
(Blogging today from Owasso, OK!)

Comments Off on >XO’s Friday Foodie: Tofu Cubes

>XO’s Friday Foodie: Tofu Cubes

Category : Healthy Eating

>
Another favorite at the Jennings’ household!
(It doesn’t look that good raw, but Jasmine likes to eat it straight out of the container)

Start with block of extra firm tofu.
(packed in water, NOT ‘silken tofu’ in the little boxes)


Slice Tofu into slabs about 1/2 inch thick.


Pat dry.
Tofu is like a sponge, so if you don’t remove some of the moisture
it will not be able to soak up the tamari sauce, etc.


Cut tofu into cubes.
Pat dry again.
Arrange as single layer in Pyrex baking dish.

Pour 2-3 Tbsp. of Tamari sauce, 2-3 Tbsp.
Olive Oil over tofu cubes.
Sprinkle with seasonings…your choice.  
Nature’s seasonings & Garlic Powder work great.
We also lightly coat with seasoned bread crumbs on occassion.

Bake in 400 degree oven for 20-25 minutes.
Flip tofu after 15 minutes.
It’s done when it is browned on the edges.
If it still seems spongy put it back in for a couple of minutes.

Miscellaneous notes:  Avoid over-marinating.  You want the flavor
on the surface, not dilluted throughout the tofu.
Can be made as ‘cutlets’ by slicing into 1/2″ slabs, drizzle with tamari
(soy sauce), flip over to coat both sides, drizzle with Olive oil, flip
over to coat both sides and then whip it in the oven!

Do you have a favorite method to prepare tofu?  Post it in the comments!

Comments Off on >Super Easy Veggie of the Week: Sweet Potato Fries

>Super Easy Veggie of the Week: Sweet Potato Fries

Category : Healthy Eating

>
These are a delicious substitute to regular fries and a great way to get your kids to eat their veggies!


Start by peeling the sweet potatoes.

Then slice them into approximately equal sized fries.


Put the raw fries into a large ziploc bag.
Add 2-3 Tablespoons of Olive Oil
Add seasonings…your choice.
We use Nature’s Seasoning, some cayenne pepper and/or garlic powder.
Shake in bag until all fries are covered.

p.s.
You can just put them on a oiled cookie sheet and then smear them with more oil and sprinkle on the seasonings, but I feel they get coated much better in the bag. The only draw back is washing out the bag if you are like me and want to re-use it.


Next, arrange fries on a cookie sheet in a single layer.
Bake at 425 degrees for about 30 minutes.
Flip them over after the first 15 minutes so they brown on both sides.

Cooking times will vary depending upon how thick you cut your fries, so use your own best judgement…
like Ryan always says, you have to try a sample!

ENJOY!


Comments Off on >XO’s Friday Foodie: 100% stone ground pizza crust

>XO’s Friday Foodie: 100% stone ground pizza crust

Category : Healthy Eating

>
Sprinkle the yeast on top.
I’ve never understood why most “whole wheat” bread recipes are 1/2 white flour.  Here is my recipe for 100% stone ground whole wheat pizza crust.  It works because I use two types of flour that I’ll explain later.

I’ve shared this only with a few of my favored clients, so I trust you’ll enjoy it too.  You can double this recipe, but you still only use one packet of yeast.  The photos are from a double batch we shared tonight with our neighbors.

Six ingredients:
1 cup hot tap water (not scalding)
1 packet dry yeast
1-2 teaspoons sugar
Allow Yeast to foam 5-10 minutes
1 cup Hodgson Stone Ground Whole Wheat Flour
1 cup Dakota Maid Stone Ground Whole Wheat Flour
1 Tablespoon EVOO (Extra Virgin Olive Oil)
 1.  Put 1 cup very hot water (not scalding) into a large glass bowl. 
2.  Stir in sugar and sprinkle yeast on TOP.
3. Allow to set 5-10 minutes.  The top should get foamy.  Technically this is called “proofing” the yeast.  Personally, I like laugh my evil laugh, turn my hands into upturned claws and declare “It’s ALIVE!”
4. Mix in the 1 cup of Hodgson and 1 cup of Dakota Maid Flours with a fork.  It will be gooey.
5. Add more flour (either kind) until it starts pulling away from the walls as you stir it.
Knead a few minutes
6. Put a small pile of flour (the other kind!) and dump the dough ball into it.  Roll the dough ball to thoroughly coat it so it doesn’t stick to your hands… as much.
7. Knead the dough by pushing it down with the palm of one hand while folding it onto itself with the other hand.
8. Knead until you have created a dough ball that is not too stiff, but not too sticky.  (I think this is where we deviate from science to an art)
9.  Coat the dough ball with EVOO, cover with a towel and place on top of your stove near the ‘warm spot’ or oven vent to rise 45-60 minutes.   Set the Stove to it’s lowest setting (200’F).  Be aware that sometimes a hot vent will slightly cook the dough.
Coat generously in Olive oil
10.  Roll out your dough onto a greased cookie sheet.
11. Turn the stove up to 400′ and prebake the crust for ~5 minutes until just firm.  Do not brown. 
12. Cover the pizza with approximately 1/2 jar or can of pizza sauce (look for no added sugar!  Ragu homestyle pizza quick sauce and Dei Fratelli’s are both good).
13.  Cover with Cheese and your favorite toppings and bake to your liking, usually 10 -12 minutes.
14.  Enjoy!


Cover and allow to rise.

OK.  A quick digression about the flours.  Hodgson is the real deal when it comes to stone ground flour.  It is very coarse and makes very dense, heavy dough.  It does not work very well by itself.  Dakota Maid is also a stone ground flour that is nearly as fine as white flour.  Together, Hodgson and Dakota Maid make a great dough that is tasty and authentically 100% stone ground whole wheat.

If you have a good recipe for a gluten free pizza crust, please share it with me.  I’ve tried a couple and they are ‘OK’ but I haven’t found one that I’m thrilled with enough to share.


Fully Risen (double batch)

Roll out the dough.  I’ve never gotten
the hang of using a rolling pin…
hence the pint glass (I know how
one of those works!)


Prebake, decorate and bake 10-12 at 400′
Enjoy!

Comments Off on >Super Easy Veggie of the Week: Roasted Cauliflower

>Super Easy Veggie of the Week: Roasted Cauliflower

Category : Healthy Eating

>
This is my absolute favorite way to eat cauliflower!


Place it on a cookie sheet sprayed with cooking oil.
Then spray the cauliflower or rub some olive oil on it
Sprinkle with your favorite seasonings.
(we use some rosemary, garlic powder and/or black pepper)


Bake at 400 degrees for about 25 minutes.

Check with a fork to make sure it is no longer crunchy,
but don’t cook it so long that it gets mushy.

ENJOY!
xo-Karin


Comments Off on >Spring Clean your Pantry

>Spring Clean your Pantry

Category : Healthy Eating

>Want to lose weight? Want to have more energy? Want to feel good about what you are eating? March is National Nutrition Month, so here’s the plan of action: Eat whole foods whenever possible and cover half your plate in fruits and vegetables at every meal.

I often work with clients who want to lose weight and expect that working out with a trainer for a few hours a week will offset their bad habits the rest of the week. It’s actually the time outside the gym, when a person isn’t working out, that counts the most toward weight loss. You must embrace a healthy lifestyle to keep the gains you make from all the hard work of exercise. An active, healthy lifestyle will help you maintain a healthy weight and live your life to the fullest. Follow these steps and you’ll be on your personal path to a healthy lifestyle.

Step 1: Clean out your pantry

Ask yourself: Is it FOOD or is it a FOOD PRODUCT? Take a look at the foods in your home. If they have more than 6 ingredients it’s probably a food product, despite all the healthy labeling. If your grandparents wouldn’t recognize it or its ingredients, THROW IT OUT! Would you rather feel guilty about throwing something away or about eating junk? Keep in mind that it is much easier to toss it than to burn off the excess calories. Consider that a person who weighs 150lbs will have to walk nearly an HOUR just to burn off six Oreo cookies!

Step 2: Go shopping

Now that you’ve removed all the junk, your kitchen may look a bit bare. Your assignment: Go shop the border of the grocery store and choose a week’s worth of fresh vegetables, fruit, meat, and dairy. Note that most of the food products are in the aisles.

Reading labels at the store may seem very time consuming, but once you have discovered what not to buy you can save a lot of time and money. You will be able to skip certain areas of the store completely! For example:

• Skip the cracker & cookie aisle: There’s zero FOOD there.

• Skip the liquid calorie aisle of juices and soft drinks (not FOOD!)

• Skip the cereal aisle except to get old fashioned oatmeal

• Skip most of the frozen foods department…it’s mostly food products.

Step 3: Cover Half your Plate in Vegetables and Fruits

This is the new “keep it simple” message from the USDA and eatright.org. It is much easier than counting how many servings you have eaten or measuring each serving. Here are some ways to eat more:

• Put vegetables/fruits on your plate first and cover half your plate with them

• If you have seconds, be sure that you reload your plate the same way (or just have more vegetables)

• Make it a habit to eat a fruit or vegetable with every meal and snack.

• Keep a fruit bowl in plain sight instead of a candy dish.

Step 4: Follow the 80/20 rule

Nobody’s perfect, so follow the 80/20 rule: 80% of the time, eat whole foods. The rest of the time, eat things that are as whole as possible. For most of us it simply is not possible to prepare a “from scratch” meal like Grandma used to make each and every day. Here are some suggestions for healthy, quick meals:

Breakfasts:

1. Old Fashioned Oatmeal (less processed than the instant stuff) add nuts and dried fruit

2. Hard-boiled egg and fresh fruit

3. Scrambled eggs are quick too; add left-over veggies and/or canned beans to increase fiber content and get that first serving of veggies for the day.

Lunch:

1. Whole wheat bread with at least 2.5 grams of fiber/slice to make your sandwich.

2. Lean lunch meats are fine, just look for the least processed ones.

3. Peanut butter (go natural)…no added sugar.

4. Be sure to include lots of fresh fruit, raw vegetables

Dinner:

1. Broiled fish or chicken (one quarter of your plate)

2. Brown Rice/Quinoa/Potato (one quarter of your plate) Prepare enough for two meals to save on time later in the week

3. Steam your vegetables until they are al dente (still firm) and cover half your plate!

Snacks:

1. Fresh fruit and a handful of nuts make a heart healthy snack.

2. Make your own trail mix with walnuts and dried fruit.

Cleaning out your pantry and creating a healthy relationship with food is a critical step toward your healthy lifestyle. It may seem like a lot of work up front, but focusing on improving the foods you and your family are eat, will give you more energy, and best of all, you’ll naturally lose weight.

Karin Jennings owns and operates XO Fitness, LLC in De Pere with her husband, Ryan. She has been a certified personal trainer since 1996. XO Fitness specializes in personal and small group training. They focus on helping people reach their health & fitness goals through exercise and lifestyle changes.

Comments Off on >Friday Foodie: Easy Salmon Patties

>Friday Foodie: Easy Salmon Patties

Category : Healthy Eating

>
Greetings! In keeping with the mission of XO Fitness to enhance your lifestyle, we’ve decided to introduce a new weekly food blog we call Friday Foodie. Ryan, Karin or one of our trainers will be sharing a healthy recipe that they love every Friday. Our intent is that these recipe’s are relatively easy, delicious and use the fewest pots and pans for easy clean-up. This week’s recipe is Easy Salmon Patties by Ryan.  Since you all know Ryan can’t count, expect the spices to be conservative estimates.  Tweak to your liking.

Salmon Patties are fast, easy, full of heart healthy Omega 3’s (nearly 800mg/pattie) and quality protein (11 grams/pattie), ~8% of your daily calcium and only 100 calories per pattie.  Depending on how you make them, they’re economical too, costing less than 50 cents a pattie.  What more could you ask for? 

How about a place to hide leftovers? Welllll, OK, I’ve got a confession to make.  I sneak leftovers into these all the time.  The ones I made last night had about a cup of quinoa mixed in.  Leftover brown basmati rice is another common additive.  Both do a great job of lightening the texture without taking over the taste.  Note:  Calorie/nutrition estimates do not include leftover inclusion!!!

Salmon Patties – Fast version:
1 can (15oz) of Salmon
2 eggs
1 teaspoon Italian seasoning
1/4 teaspoon garlic powder
1/4 teaspoon onion powder
1/8-1/4 teaspoon salt (optional)
1 pinch of black pepper
1/4 cup (or so) bread crumbs ( Panko crumbs are the best with the fewest ingredients, the ones I used for this time are definitely a food product with a list of ingredients as long as my arm.  Might as well be wonder bread.  Calcium Propionate?  Yum!)

Open the can of salmon and pour off the broth into a largish mixing bowl (or discard to reduce sodium).  Place the salmon onto a plate and pull apart the pieces and remove the larger spine bones.  This is probably not necessary, but I do it anyway.  (All other bones and skin will mash up and are a great source of natural calcium.  Did you just say Ewww?  See alternate boneless option below). 

Put the salmon into the bowl with the two eggs and all spices.  Mix up with a fork.  Add the bread crumbs a little at a time until you have a mixture that is Pattie-worthy.

I like to use an ice-cream scoop to plop even amounts onto my hand, form into patties and arrange onto a pre-heated, canola or olive oil sprayed pan.  Brown on both sides. Serve plain, on a halved slice of toasted bread as a bun (3+ fiber/slice) or as a leftover with an egg for breakfast.

That’s it. If you divide it into 9 servings, it is about 101 calories per serving with 3 grams of carbohydrates, 5 grams of fat, and 11 grams of protein. It includes almost no fiber and 267mg of Sodium (without optional salt).  FYI:  Current recommendations are 1500mg a day or less of sodum.  It’s hard to stay under 1500mg unless you cook and pay very close attention.

Variations:
Slightly more complex version for those with time:  Replace the onion and garlic powder with 1/4 cup+ of finely diced onions and a crushed clove of fresh garlic.

Boneless but more expensive version for anyone not willing to handle bone removal:  Substitute the inexpensive can (~$2.50) with (3) 6 oz packets (~$6-7) of Chicken of the Sea Pink Salmon (plain, not flavored). BTW: Interestingly Omega 3’s drop by over 60% if you choose this option (1000mg down to 400mg) and no bones = no calcium. You could get a pound of salmon fillet and broil it for the slightly more money.  Your choice but I’d go for the fillet!

There you have it:  Easy Salmon Patties.  Whip these babies up, put one on a plate with a serving of quinoa or brown rice and the other half covered with steamed veggies and you’ve got a simple, delicious, home cooked meal.  Still hungry, load your plate the same way, not playing favorites.  Plate loading at it’s finest.

Enjoy!  -Ryan.